

Introduction to Solar DIY
Why Choose Solar Power?
Solar power is an increasingly popular choice for homeowners looking to reduce their carbon footprint and save on energy costs. By harnessing the sun’s energy, you can generate clean, renewable electricity for your home. This not only helps the environment but also provides a hedge against rising utility rates. Solar power systems can significantly reduce or even eliminate your electricity bills, offering long-term financial benefits. Additionally, many regions offer incentives and rebates for solar installations, making it an even more attractive option.
Benefits of Installing Solar Panels Yourself
Taking the DIY route for your solar panel installation comes with several advantages:
- Cost Savings: By installing the panels yourself, you can save a substantial amount on labor costs, which can be a significant portion of the overall installation expense.
- Personal Satisfaction: Completing a solar installation project on your own can be incredibly rewarding. It provides a sense of accomplishment and a deeper understanding of how your home energy system works.
- Customization: DIY installation allows you to tailor the system to your specific needs and preferences, ensuring that you get the most out of your solar investment.
- Learning Experience: The process of installing solar panels can be educational, equipping you with valuable skills and knowledge about renewable energy systems.
Overview of the Installation Process
Installing solar panels yourself involves several key steps, each requiring careful planning and execution. Here’s a brief overview of what to expect:
- Planning: Assess your energy needs, evaluate your site for solar suitability, choose the right solar panels and equipment, and understand local regulations and permits.
- Preparation: Gather necessary tools and materials, take safety precautions, and set up your work area.
- Installation: Mount the solar panels, connect them to the inverter, wire the system to your home, and perform testing and troubleshooting.
- Maintenance: Regularly clean and inspect your panels, monitor system performance, and handle any repairs or replacements as needed.
By following these steps, you can successfully install a solar power system that meets your energy needs and contributes to a more sustainable future. Whether you’re motivated by cost savings, environmental concerns, or the desire to take on a new challenge, DIY solar installation can be a fulfilling and impactful project.
Planning Your Solar Panel Installation
Assessing Your Energy Needs
Before diving into the installation process, it’s crucial to understand your household’s energy consumption. Start by reviewing your electricity bills from the past year to determine your average monthly and annual energy usage. This will help you size your solar panel system appropriately. Tools like online solar calculators can provide a quick estimate of how many panels you’ll need based on your energy consumption and location.
Evaluating Your Site for Solar Suitability
Not every home is ideal for solar panels. To evaluate your site’s suitability, consider the following factors:
- Sunlight Exposure: Your roof should receive ample sunlight throughout the day. South-facing roofs are typically the best, but east and west-facing roofs can also work.
- Roof Condition: Ensure your roof is in good condition and can support the weight of the solar panels. If your roof needs repairs, it’s best to address them before installation.
- Shading: Check for any potential shading from trees, buildings, or other obstructions. Even partial shading can significantly reduce the efficiency of your solar panels.
- Space Availability: Make sure you have enough space to install the number of panels required to meet your energy needs.
Choosing the Right Solar Panels and Equipment
Selecting the right solar panels and equipment is essential for a successful installation. Here are some key considerations:
- Panel Type: There are three main types of solar panels: monocrystalline, polycrystalline, and thin-film. Monocrystalline panels are the most efficient but also the most expensive. Polycrystalline panels offer a good balance between cost and efficiency, while thin-film panels are less efficient but more flexible and lightweight.
- Inverter: The inverter converts the direct current (DC) produced by the panels into alternating current (AC) used by your home. You can choose between string inverters, microinverters, and power optimizers. Microinverters and power optimizers offer better performance in shaded conditions but are more expensive.
- Mounting System: The mounting system secures the panels to your roof or ground. Ensure the system you choose is compatible with your roof type and can withstand local weather conditions.
- Battery Storage: If you want to store excess energy for use during cloudy days or power outages, consider adding a battery storage system. This is especially important for off-grid systems.
Understanding Local Regulations and Permits
Navigating local regulations and obtaining the necessary permits is a critical step in the installation process. Here’s what you need to know:
- Building Permits: Most local governments require a building permit for solar panel installations. Check with your local building department to understand the specific requirements and fees.
- Electrical Permits: An electrical permit may also be required, especially if you are connecting the system to the grid. This usually involves an inspection by a licensed electrician.
- Zoning Laws: Some areas have zoning laws that restrict where you can install solar panels. Make sure your installation complies with these regulations.
- Utility Interconnection: If you plan to connect your system to the grid, you’ll need to apply for interconnection with your utility company. This process often includes an inspection and the installation of a bi-directional meter for net metering.
- Incentives and Rebates: Research available incentives and rebates in your area. Some incentives require the installation to be performed by a certified professional, so make sure your DIY project qualifies.
By thoroughly planning your solar panel installation, you can ensure a smooth and successful project that meets your energy needs and complies with all local regulations.
Preparing for Installation
Gathering Necessary Tools and Materials
Before you begin the installation of your solar panels, it’s crucial to gather all the necessary tools and materials. This preparation will save you time and ensure a smoother installation process. Here is a list of essential items you will need:
- Solar Panels: Ensure you have the correct number and type of panels for your energy needs.
- Mounting Hardware: This includes rails, brackets, and screws to secure the panels to your roof or ground mount.
- Inverter: Converts the DC electricity generated by the panels into AC electricity for your home.
- Batteries (optional): For storing excess energy.
- Wiring and Connectors: To connect the panels to the inverter and your home’s electrical system.
- Tools: Drill, screwdriver, wrench set, wire cutters, and a multimeter for electrical testing.
- Safety Gear: Gloves, safety glasses, and a harness if you are working on a roof.
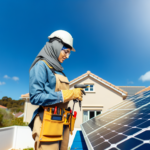
Safety Precautions and Best Practices
Safety should be your top priority when installing solar panels. Here are some essential safety precautions and best practices to follow:
- Work with a Partner: Never attempt to install solar panels alone. Having at least one other person can help with lifting heavy panels and ensure safety.
- Use Proper Safety Gear: Always wear gloves, safety glasses, and a harness if you are working on a roof. Ensure your ladder is secure and stable.
- Turn Off Electricity: Before connecting your solar system to your home’s electrical panel, turn off the main power to avoid electrical shocks.
- Follow Manufacturer Instructions: Adhere to the installation guidelines provided by the solar panel and inverter manufacturers.
- Check Weather Conditions: Avoid installing panels in wet or windy conditions to reduce the risk of accidents.
Setting Up Your Work Area
A well-organized work area can significantly streamline the installation process. Here are some tips for setting up your work area:
- Clear the Area: Ensure the installation site is free of debris and obstacles. This includes clearing any leaves, branches, or other items from your roof or ground mount area.
- Organize Tools and Materials: Lay out all your tools and materials in an easily accessible manner. This will save you time and reduce the risk of accidents.
- Mark Installation Points: Use chalk or a marker to outline where each panel and piece of mounting hardware will go. This will help ensure accurate placement and alignment.
- Prepare for Electrical Work: Set up a designated area for handling electrical components, away from the main installation site, to keep things organized and safe.
- Check Equipment: Double-check that all your equipment is in good working condition before you start. This includes testing your drill, ensuring your ladder is stable, and verifying that your safety gear is intact.
By thoroughly preparing for the installation, you can ensure a safer, more efficient process. Taking the time to gather the right tools, follow safety precautions, and set up your work area properly will pay off in the long run, making your DIY solar panel installation a success.
Step-by-Step Installation Guide
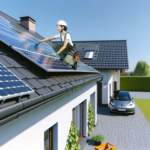
Mounting the Solar Panels
Mounting your solar panels is the first critical step in the installation process. Begin by selecting a suitable location, typically a roof or a ground-mounted system, that receives maximum sunlight throughout the day. Use a sturdy racking system to secure the panels. For roof installations, ensure the mounting brackets are firmly attached to the roof rafters to withstand wind and weather conditions. Ground-mounted systems should be anchored securely into the ground. Always follow the manufacturer’s instructions for mounting to ensure safety and efficiency.
Connecting the Panels to the Inverter
Once the panels are securely mounted, the next step is to connect them to the inverter. The inverter is a crucial component that converts the direct current (DC) generated by the solar panels into alternating current (AC) used by most household appliances. Begin by connecting the positive and negative wires from the solar panels to the corresponding terminals on the inverter. Ensure all connections are tight and secure to prevent any power loss or safety hazards. It’s advisable to use a combiner box if you have multiple panels, as it simplifies the wiring process and enhances safety.
Wiring the System to Your Home
After connecting the panels to the inverter, the next step is to wire the system to your home’s electrical panel. This step should be approached with caution, as it involves working with high-voltage electricity. First, turn off the main power supply to avoid any electrical shocks. Connect the output wires from the inverter to a dedicated circuit breaker in your electrical panel. This breaker will serve as the point of integration between your solar power system and your home’s electrical grid. Ensure all connections are properly insulated and secured to prevent any electrical faults.
Testing and Troubleshooting
Once all components are connected, it’s time to test the system. Turn on the main power supply and the inverter. Check the inverter’s display to ensure it’s receiving power from the solar panels and converting it correctly. Use a multimeter to verify the voltage and current at various points in the system. If the readings are within the expected range, your system is functioning correctly. If not, troubleshoot by checking all connections, ensuring there are no loose wires or faulty components. Regularly monitor the system’s performance to ensure it continues to operate efficiently.
By following these steps, you can successfully install your home solar panels and start enjoying the benefits of renewable energy. Always prioritize safety and consult a professional if you encounter any issues beyond your expertise.
Maintenance and Upkeep
Regular Cleaning and Inspection
Maintaining your solar panels is crucial to ensure they operate at peak efficiency. While solar panels generally require minimal maintenance, regular cleaning is essential to remove dirt, debris, and other obstructions that can reduce their effectiveness. It is recommended to clean your solar panels between two and four times a year, depending on your local environment and weather conditions.
To clean your panels, you can use a garden hose to spray them down with lukewarm water. Avoid using cleaning agents or soap, as these can leave streaks and potentially damage the panels. For more stubborn dirt, a non-abrasive microfiber cloth can be used. If your panels are on the roof, exercise caution by using a safety harness or a telescopic pole to clean from the ground.
In winter, snow and ice can accumulate on your panels. While the angled design of most panels helps snow to slide off, you may need to spray them with lukewarm water or use a non-abrasive brush to clear persistent snow and ice. Avoid using hot water, as the temperature difference can crack the panels.
Monitoring System Performance
Monitoring the performance of your solar panels is essential to ensure they are functioning correctly and efficiently. Many solar companies offer mobile apps that allow you to track the energy production of each panel in real-time. These apps can alert you to any dips in performance, which may indicate that your panels need cleaning or that there is an issue that requires attention.
By integrating a solar panel monitoring system, you can track how much energy your panels produce daily and over time. This data helps you understand how external factors, such as weather conditions, affect your panels’ performance and allows you to address any issues promptly.
Handling Repairs and Replacements
While solar panels are designed to be durable and withstand various weather conditions, they may occasionally require repairs or replacements. If you notice a significant drop in performance or physical damage to your panels, it is best to contact a professional for an assessment.
If your panels are still under warranty, the company that installed them will typically handle repairs or replacements. Manufacturer warranties often cover defects in materials and workmanship, while performance warranties guarantee a certain level of energy output over time. Be sure to read the fine print of your warranty to understand what is covered and any maintenance requirements to keep the warranty valid.
For any repairs or replacements, it is advisable to hire a professional rather than attempting to fix the panels yourself. This ensures that the work is done correctly and safely, maintaining the efficiency and longevity of your solar panel system.
In summary, regular cleaning, performance monitoring, and professional handling of repairs and replacements are key to maintaining your solar panels. By staying on top of these tasks, you can ensure that your panels continue to provide efficient, renewable energy for years to come.
Maximizing Your Solar Investment
Energy Efficiency Tips
To get the most out of your solar panels, it’s essential to focus on energy efficiency within your home. Here are some key tips:
- Choose the Right Solar Panels: Not all solar panels are created equal. Opt for high-quality panels from reputable manufacturers, preferably those made from monocrystalline or polycrystalline silicon, which offer higher efficiencies.
- Properly Size Your System: Accurately assess your household’s electricity usage to size your system correctly. An oversized system may not provide additional benefits, while an undersized system will generate less power than needed.
- Optimize Panel Orientation and Angle: Ensure your panels are oriented and angled to receive maximum sunlight. Generally, south-facing installations are ideal in North America.
- Keep Panels Clean: Regularly clean your panels to remove dirt and debris that can block sunlight and reduce efficiency. A simple rinse with a garden hose is often sufficient.
- Minimize Shading: Install panels in locations free from shading caused by trees, buildings, or other obstructions.
- Install Energy-Efficient Appliances: Replace older appliances with ENERGY STAR certified or high-efficiency models. Use LED lightbulbs and smart thermostats to manage energy consumption better.
- Use Solar-Generated Electricity Wisely: Maximize the use of solar power by running appliances during peak production periods.
- Monitor System Performance: Regularly check your system’s performance using connected software to ensure it functions optimally and to identify any issues promptly.
- Utilize Energy Storage Solutions: Consider investing in a solar battery storage solution to store excess energy for use during periods of low production or high demand.
Integrating Solar with Other Renewable Energy Sources
Combining solar power with other renewable energy sources can further enhance your energy independence and efficiency. Here are some ways to integrate multiple renewable sources:
- Wind Turbines: If your location is suitable, adding a wind turbine can complement your solar panels, especially during cloudy or nighttime conditions when solar production is low.
- Hydropower: For properties with access to flowing water, small-scale hydropower systems can provide a consistent energy source, particularly during periods when solar and wind are less effective.
- Geothermal Systems: Geothermal heating and cooling systems can reduce your reliance on electricity for temperature regulation, making your overall energy consumption more efficient.
- Energy Storage: Integrate battery storage systems to store energy from multiple sources, ensuring a steady supply of power regardless of weather conditions.
Taking Advantage of Incentives and Rebates
Financial incentives and rebates can significantly reduce the cost of your solar installation and increase your return on investment. Here are some ways to take advantage of these opportunities:
- Federal Tax Credits: The federal government offers tax credits for solar installations, which can cover a substantial portion of your costs. Be sure to check the current rates and eligibility requirements.
- State and Local Incentives: Many states and local governments offer additional incentives, including rebates, tax credits, and grants. Research the programs available in your area to maximize your savings.
- Utility Company Rebates: Some utility companies provide rebates for solar installations. Contact your utility provider to learn about any available programs.
- Net Metering: Net metering programs allow you to sell excess solar energy back to the grid, providing additional financial benefits. Check if your utility company offers net metering and understand the terms.
- Community-Based Programs: Look for community-based group purchasing programs that offer discounts on solar installations through bulk purchasing agreements.
By implementing these energy efficiency tips, integrating other renewable energy sources, and taking advantage of available incentives and rebates, you can maximize your solar investment and enjoy long-term savings and energy independence.
Conclusion
Recap of Key Points
As we conclude our guide on installing your home solar panels, let’s revisit the essential points covered. We began with an introduction to the benefits of solar power and the advantages of a DIY installation, including cost savings and the satisfaction of completing a complex project. We then moved on to the planning phase, emphasizing the importance of assessing your energy needs, evaluating your site, choosing the right equipment, and understanding local regulations. Preparation was the next critical step, where we discussed gathering tools, safety precautions, and setting up your work area. The step-by-step installation guide provided detailed instructions on mounting panels, connecting them to the inverter, wiring the system, and testing it. Finally, we covered maintenance tips to ensure your system’s longevity and ways to maximize your solar investment through energy efficiency and incentives.
Encouragement for DIY Enthusiasts
For those with a DIY spirit, embarking on a solar panel installation project can be incredibly rewarding. Not only do you save on labor costs, but you also gain a deeper understanding of your energy system and contribute to a more sustainable future. While the process can be challenging, the sense of accomplishment and the long-term benefits make it worthwhile. Remember, thorough planning and adherence to safety protocols are crucial. Don’t hesitate to seek professional help for specific tasks if needed. Your dedication and effort will pay off in the form of reduced energy bills, increased energy independence, and a smaller carbon footprint.
Future Trends in Solar Technology
The future of solar technology is bright and full of exciting advancements. Innovations in solar panel efficiency, energy storage solutions, and smart grid technology are continually emerging. For instance, bifacial solar panels, which capture sunlight on both sides, are becoming more popular and efficient. Energy storage systems are also evolving, with new battery technologies offering longer life spans and higher capacities. Additionally, the integration of solar power with other renewable energy sources, such as wind and hydro, is gaining traction, providing more comprehensive and resilient energy solutions. Keeping an eye on these trends can help you make informed decisions and stay ahead in your solar journey.
In conclusion, installing your home solar panels is a significant but manageable project that offers numerous benefits. With careful planning, attention to detail, and a willingness to learn, you can successfully harness the power of the sun and enjoy the rewards for years to come. Happy solar DIY-ing!
