Introduction to Solar Water Heating Systems
The Importance of Eco-Friendly Solutions
In today’s world, the need for eco-friendly solutions has never been more critical. With the increasing awareness of climate change and the environmental impact of fossil fuels, many homeowners are seeking sustainable alternatives to reduce their carbon footprint. One such solution is the adoption of solar water heating systems. These systems harness the power of the sun, a renewable and abundant energy source, to heat water for domestic use. By doing so, they significantly reduce the reliance on conventional energy sources, which are often associated with greenhouse gas emissions and environmental degradation.
Benefits of Solar Water Heating
Solar water heating systems offer a multitude of benefits that make them an attractive option for eco-conscious homeowners. Here are some of the key advantages:
- Cost Savings: Once installed, solar water heaters can drastically reduce your monthly energy bills. The sun’s energy is free, and after the initial investment, the operational costs are minimal.
- Environmental Impact: By using solar energy, you reduce your dependence on fossil fuels, thereby decreasing your carbon footprint and contributing to a cleaner environment.
- Energy Independence: Solar water heating systems provide a degree of energy independence, protecting you from fluctuating energy prices and supply disruptions.
- Versatility: These systems can be used in various climates and are adaptable to different household needs, making them a versatile solution for many homeowners.
- Increased Property Value: Homes equipped with solar water heating systems often have higher property values due to their energy efficiency and sustainability features.
Overview of DIY Solar Water Heating Systems
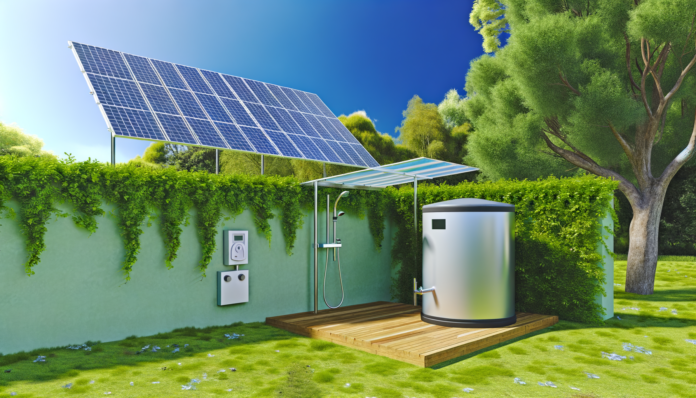
For those who enjoy hands-on projects and wish to save on installation costs, a DIY solar water heating system can be an excellent choice. These systems are designed to be cost-effective and relatively straightforward to build, making them accessible to many homeowners. Here’s a brief overview of what a DIY solar water heating system entails:
- Solar Collectors: These are the heart of the system, capturing solar energy and converting it into heat. DIY systems often use flat-plate collectors or evacuated tube collectors, which can be built using readily available materials.
- Storage Tanks: The heated water is stored in insulated tanks, which can be either integrated with the collector or separate. These tanks ensure a steady supply of hot water even when the sun is not shining.
- Plumbing and Controls: Proper plumbing is essential to connect the collectors to the storage tank and your home’s water system. Additionally, simple controls can be installed to regulate the flow of water and ensure efficient operation.
- Insulation: Insulating the system is crucial to minimize heat loss and maximize efficiency. This includes insulating the storage tank, pipes, and sometimes the collectors themselves.
Building a DIY solar water heating system can be a rewarding project that not only saves money but also promotes sustainable living. With the right materials, tools, and a bit of effort, you can enjoy the benefits of eco-friendly hot showers while contributing to a greener planet.
Understanding How Solar Water Heating Works
Basic Principles of Solar Energy
Solar energy harnesses the power of the sun to generate heat or electricity. In the context of solar water heating, this energy is captured and used to heat water for domestic use. The sun’s rays contain photons, which are absorbed by solar collectors and converted into thermal energy. This process is both eco-friendly and cost-effective, as it relies on a renewable and free energy source.
Components of a Solar Water Heating System
A solar water heating system typically consists of several key components:
- Solar Collectors: These are the devices that capture solar energy. They come in various types, including flat-plate collectors, evacuated-tube collectors, and integral collector-storage systems.
- Storage Tanks: Insulated tanks that store the heated water. They often have additional outlets and inlets to connect to the solar collectors.
- Heat Exchangers: Used in indirect circulation systems to transfer heat from a non-freezing fluid to the water.
- Circulating Pumps and Controls: Found in active systems, these components help circulate water or heat-transfer fluids through the system.
- Backup Heaters: Conventional water heaters that provide hot water when solar energy is insufficient.
How Solar Collectors Work
Solar collectors are the heart of a solar water heating system. They capture and convert solar energy into heat. There are three main types of solar collectors:
- Flat-Plate Collectors: These are insulated, weatherproofed boxes containing a dark absorber plate under one or more glass or plastic covers. They are commonly used for residential applications.
- Evacuated-Tube Collectors: These consist of parallel rows of transparent glass tubes. Each tube contains a glass outer tube and a metal absorber tube attached to a fin. The fin’s coating absorbs solar energy while minimizing heat loss.
- Integral Collector-Storage Systems: Also known as ICS or batch systems, these feature one or more black tanks or tubes in an insulated, glazed box. Cold water passes through the solar collector, preheating before it reaches the conventional backup water heater.
Heat Transfer and Storage
The process of heat transfer and storage is crucial for the efficiency of a solar water heating system. In direct circulation systems, water is directly heated by the solar collectors and then circulated into the home. In indirect circulation systems, a non-freezing heat-transfer fluid is heated by the collectors and then passes through a heat exchanger, which in turn heats the water.
Storage tanks play a vital role in maintaining a steady supply of hot water. These tanks are well-insulated to minimize heat loss and can be part of either a one-tank or two-tank system. In a one-tank system, the solar storage and backup heater are combined, while in a two-tank system, the solar heater preheats the water before it enters the conventional water heater.
By understanding these fundamental principles and components, you can better appreciate how solar water heating systems work and their potential benefits for eco-friendly living.
Planning Your DIY Solar Water Heating System
Assessing Your Hot Water Needs
Before diving into the installation of a DIY solar water heating system, it’s crucial to assess your hot water needs. This involves understanding the daily hot water consumption of your household. Typically, the average person uses about 20-30 gallons of hot water per day for activities such as showering, washing dishes, and laundry. Multiply this by the number of people in your household to get a rough estimate of your daily hot water usage. This will help you determine the size and capacity of the solar water heating system you need to install.
Choosing the Right Location
The efficiency of your solar water heating system heavily depends on its location. Ideally, the solar collector should be placed in an area that receives maximum sunlight throughout the day. A south-facing roof or wall is often the best choice in the Northern Hemisphere. Ensure that the location is free from obstructions like trees, buildings, or other structures that could cast shadows on the collector. Additionally, consider the structural integrity of the chosen location, especially if you plan to mount the collector on a roof. The area should be able to support the weight of the collector and withstand weather conditions.
Sizing Your System
Sizing your solar water heating system correctly is essential for optimal performance. The size of the system is determined by the amount of hot water you need and the amount of sunlight your location receives. A general rule of thumb is to have 1.5 to 2 square feet of collector area per gallon of hot water needed per day. For instance, if your household uses 60 gallons of hot water daily, you would need a collector area of approximately 90 to 120 square feet. Additionally, the storage tank should be large enough to hold one to two days’ worth of hot water. This ensures that you have a sufficient supply even on cloudy days.
Gathering Materials and Tools
Once you have assessed your hot water needs, chosen the right location, and sized your system, the next step is to gather the necessary materials and tools. Here is a list of common materials and tools you will need:
- Solar Collector: This is the component that captures solar energy and heats the water. You can either purchase a pre-made collector or build one yourself using materials like copper pipes and a glass or polycarbonate cover.
- Storage Tank: A well-insulated tank to store the heated water. You can use a repurposed water heater tank or purchase a new one.
- Plumbing Materials: Pipes (copper, CPVC, or PEX), fittings, valves, and insulation for the plumbing system.
- Mounting Hardware: Brackets, screws, and other hardware to securely mount the solar collector.
- Tools: Basic tools such as a drill, screwdriver, pipe cutter, wrench, and soldering kit for copper pipes.
- Insulation: To minimize heat loss, insulate the pipes and storage tank using foam or fiberglass insulation.
- Controller and Pump (if needed): For active systems, you will need a controller to regulate the pump that circulates the water between the collector and the storage tank.
By carefully planning and gathering all the necessary materials and tools, you can ensure a smooth and efficient installation process for your DIY solar water heating system. This preparation will not only save you time but also help you avoid potential issues during the installation.
Step-by-Step Installation Guide
Building the Solar Collector
To start, you’ll need to build the solar collector, which is the heart of your solar water heating system. Here’s a step-by-step guide:
1. **Frame Construction**: Use the 4’x4′ sheet of plywood and the 2x2x8′ pressure-treated lumber to create a sturdy frame. Cut the lumber to form a rectangular frame and secure it to the plywood using screws.
2. **Tubing Layout**: Lay out the black polyurethane irrigation tubing in a serpentine pattern on the plywood. Secure the tubing with black zip ties, ensuring it is evenly spaced and tightly secured.
3. **Painting**: Spray the entire assembly with Krylon Colormaxx Paint+Primer in flat black to maximize heat absorption.
4. **Optional Plexiglass Cover**: For added efficiency, you can cover the collector with a piece of plexiglass cut to size. This will help trap heat and protect the tubing.
Installing the Collector
Once your solar collector is built, it’s time to install it in the optimal location:
1. **Location**: Choose a spot with maximum sun exposure, ideally facing south. The roof is a common choice, but a ground-mounted system can also work.
2. **Mounting**: Secure the collector to the chosen surface using appropriate mounting brackets and screws. Ensure it is tilted at an angle equal to your latitude for optimal sun exposure.
3. **Safety**: Make sure the installation is secure and stable to withstand wind and weather conditions.
Connecting the Plumbing
Next, you’ll need to connect the plumbing to integrate the solar collector with your existing water system:
1. **Inlet and Outlet Connections**: Attach the 1/2″ irrigation tubing to the garden hose adapters. Connect one end to the cold water supply and the other to the inlet of the solar collector.
2. **Return Line**: Connect the outlet of the solar collector to the storage tank using another garden hose.
3. **Pump Installation**: Install the 1/4 HP submersible utility pump in the storage tank to circulate water through the system.
Setting Up the Storage Tank
The storage tank is where the heated water will be stored until it’s needed:
1. **Tank Placement**: Place the storage tank in a location that is easily accessible and close to the solar collector.
2. **Connections**: Connect the return line from the solar collector to the inlet of the storage tank. Ensure all connections are tight and leak-free.
3. **Pump Setup**: Connect the pump to the power supply and ensure it is functioning correctly to circulate water through the system.
Insulating the System
Proper insulation is crucial to maintain the efficiency of your solar water heating system:
1. **Pipe Insulation**: Use foam pipe insulation to cover all exposed pipes. This will minimize heat loss as water travels between the collector and the storage tank.
2. **Tank Insulation**: If your storage tank is not pre-insulated, wrap it with an insulating blanket to retain heat.
3. **Weatherproofing**: Ensure all connections and components are weatherproofed to protect against the elements.
By following these steps, you can successfully install a DIY solar water heating system that provides eco-friendly hot showers while reducing your energy bills.
Maintenance and Troubleshooting
Regular Maintenance Tasks
Maintaining your DIY solar water heating system is crucial for ensuring its longevity and efficiency. Here are some regular maintenance tasks you should perform:
- Inspect the Solar Collectors: Check for any debris, dirt, or leaves that may have accumulated on the collectors. Clean the surface with water and a soft brush to ensure maximum sunlight absorption.
- Check for Leaks: Regularly inspect all plumbing connections, valves, and the storage tank for any signs of leaks. Tighten any loose connections and replace any damaged components.
- Monitor the Pump and Controller: Ensure that the pump is operating smoothly and the controller is functioning correctly. Listen for any unusual noises from the pump and check the controller’s display for error messages.
- Inspect Insulation: Check the insulation on pipes and the storage tank. Replace any worn or damaged insulation to prevent heat loss.
- Flush the System: Periodically flush the system to remove any sediment or mineral buildup in the storage tank and pipes. This helps maintain efficient heat transfer and prolongs the life of the system.
Common Issues and Solutions
Even with regular maintenance, you may encounter some common issues with your solar water heating system. Here are a few problems and their solutions:
- Low Water Temperature: If the water temperature is lower than expected, check the solar collectors for shading or dirt. Ensure the pump is working correctly and that there are no airlocks in the system. Adjust the controller settings if necessary.
- Leaks: Leaks can occur at various points in the system. Inspect all connections, valves, and the storage tank. Tighten any loose fittings and replace any damaged components. Use pipe sealant or Teflon tape on threaded connections to prevent leaks.
- Pump Failure: If the pump is not operating, check the power supply and controller settings. Ensure the pump is not clogged with debris. If the pump is faulty, replace it with a new one.
- Controller Malfunction: If the controller is not functioning correctly, check the wiring and connections. Ensure the temperature sensors are properly placed and functioning. If the controller is faulty, consider replacing it with a new one.
Seasonal Considerations
Seasonal changes can affect the performance of your solar water heating system. Here are some considerations for different seasons:
- Winter: In colder climates, ensure that the system is protected from freezing. Use antifreeze solutions in the heat transfer fluid or drain the system during freezing temperatures. Insulate exposed pipes and the storage tank to prevent heat loss.
- Summer: During the summer, the system may produce more hot water than needed. To prevent overheating, consider using a heat dump or shading the collectors. Adjust the controller settings to optimize performance.
- Spring and Fall: These transitional seasons may require adjustments to the system settings. Monitor the system’s performance and make necessary adjustments to the controller and pump settings to ensure optimal operation.
By performing regular maintenance, addressing common issues promptly, and considering seasonal adjustments, you can ensure that your DIY solar water heating system operates efficiently and provides eco-friendly hot water for years to come.
Maximizing Efficiency and Performance
Optimizing Solar Collector Placement
Proper placement of your solar collector is crucial for maximizing the efficiency of your DIY solar water heating system. The primary goal is to ensure that the collector receives the maximum amount of sunlight throughout the day.
- Orientation: Position the solar collector to face true south in the Northern Hemisphere and true north in the Southern Hemisphere. This orientation ensures that the collector captures the most sunlight.
- Tilt Angle: The tilt angle of the collector should be equal to your latitude to maximize year-round performance. For seasonal optimization, increase the angle by 15 degrees in winter and decrease it by 15 degrees in summer.
- Shading: Ensure that the collector is free from shading by trees, buildings, or other obstructions, especially during peak sunlight hours (10 AM to 3 PM).
- Elevation: Mount the collector at an elevated position, such as a rooftop, to avoid ground-level obstructions and to capture more direct sunlight.
Enhancing Heat Retention
To maximize the efficiency of your solar water heating system, it is essential to minimize heat loss. Here are some strategies to enhance heat retention:
- Insulation: Insulate all pipes and the storage tank to reduce heat loss. Use high-quality, weather-resistant insulation materials to ensure durability and effectiveness.
- Double Glazing: If your solar collector uses a glass cover, consider using double glazing. This technique involves two layers of glass with an air gap in between, which significantly reduces heat loss.
- Reflective Surfaces: Line the interior of the collector box with reflective materials, such as aluminum foil, to direct more sunlight onto the absorber plate and reduce heat loss.
- Sealing: Ensure that all joints and connections are tightly sealed to prevent air leaks, which can lead to significant heat loss.
Integrating with Existing Systems
Integrating your DIY solar water heating system with your existing water heating setup can further enhance efficiency and performance. Here are some tips for seamless integration:
- Pre-Heating: Use the solar water heater to pre-heat the water before it enters your conventional water heater. This reduces the energy required by the conventional heater, leading to energy savings.
- Backup Heating: Ensure that your conventional water heater is set up as a backup system. This way, it can provide additional heating when solar energy is insufficient, such as during cloudy days or at night.
- Temperature Control: Install a mixing valve to regulate the temperature of the water coming from the solar heater. This ensures a consistent water temperature and prevents scalding.
- Monitoring and Automation: Consider installing a monitoring system to track the performance of your solar water heater. Automated controls can optimize the use of solar energy and switch to backup heating when necessary.
By carefully optimizing the placement of your solar collector, enhancing heat retention, and integrating the system with your existing setup, you can significantly improve the efficiency and performance of your DIY solar water heating system. These steps not only ensure a steady supply of hot water but also contribute to energy savings and environmental sustainability.
Conclusion and Additional Resources
Recap of Benefits
Installing a DIY solar water heating system offers numerous advantages that extend beyond just having hot showers. Firstly, it significantly reduces your energy bills by harnessing the sun’s free and renewable energy. This not only saves money but also decreases your reliance on non-renewable energy sources, contributing to a more sustainable lifestyle. Additionally, solar water heating systems are environmentally friendly, reducing your carbon footprint and helping to combat climate change. The DIY aspect of the project also provides a sense of accomplishment and self-reliance, as you gain hands-on experience in renewable energy technology.
Further Reading and Resources
For those interested in diving deeper into the world of solar water heating and other renewable energy projects, here are some valuable resources:
- Build It Solar – A comprehensive resource for DIY solar projects, including detailed guides and user experiences.
- U.S. Department of Energy: Solar Water Heaters – Official guidelines and information on solar water heating systems.
- Home Power Magazine – Offers articles and tutorials on various renewable energy projects, including solar water heating.
- Solar Thermal World – A global knowledge hub for solar thermal energy, providing news, case studies, and technical papers.
Encouragement for Sustainable Living
Embarking on a DIY solar water heating project is more than just a home improvement task; it’s a step towards a more sustainable and eco-friendly lifestyle. By choosing to harness solar energy, you are making a conscious decision to reduce your environmental impact and promote renewable energy solutions. This project can serve as a gateway to other sustainable practices, such as energy-efficient home improvements, waste reduction, and water conservation.
Remember, every small step towards sustainability counts. Whether it’s installing a solar water heating system, reducing energy consumption, or recycling, your efforts contribute to a healthier planet. Encourage your friends and family to join you in these initiatives, and together, we can make a significant impact. Sustainable living is not just a trend; it’s a necessity for our future. So, take pride in your DIY solar water heating system and continue to explore other ways to live sustainably. Your actions today will pave the way for a greener tomorrow.

